【TensorFlow】TensorFlow Object Detection APIで物体検出する方法を紹介します!
TensorFlow Object Detection APIを利用すれば画像内の特定のオブジェクトを簡単に検出することができます。この記事ではTensorFlow Object Detection APIのインストールから学習や推論方法を解説して、数字の0~9の10パターンを検出する方法を紹介します。
こちらの記事を参考にGPUに対応したWindows版TensorFlow2.10.1をインストールして下さい。

Anaconda PowerShell PromptでConda環境 tf がアクティブになっている状態から始めます。
conda activate tf
| 環境 | バージョン |
|---|---|
| Windows | 10 |
| TensorFlow | 2.10.1 |
TensorFlow Object Detection APIのインストール
gitをインストールします。
conda install git
TensorFlow Model Gardenをクローンします。
git clone https://github.com/tensorflow/models.git
プロトコルバッファーをインストールします。
conda install protobuf
models/researchに移動してprotoファイルをコンパイルします。
cd models/research
protoc object_detection/protos/*.proto --python_out=.
TensorFlow2用のObject Detection APIをインストールします。
cp object_detection/packages/tf2/setup.py .
python -m pip install .
最後にObject Detection APIをテストします。
python object_detection/builders/model_builder_tf2_test.py
エラーが出ていないか確認して下さい。
Ran 24 tests in 21.179s

OK (skipped=1)
以上でTensorFlow Object Detection APIのインストールは終了です。
学習データの準備
VoTTで各数字にタグ付けして学習に必要なデータを準備します。
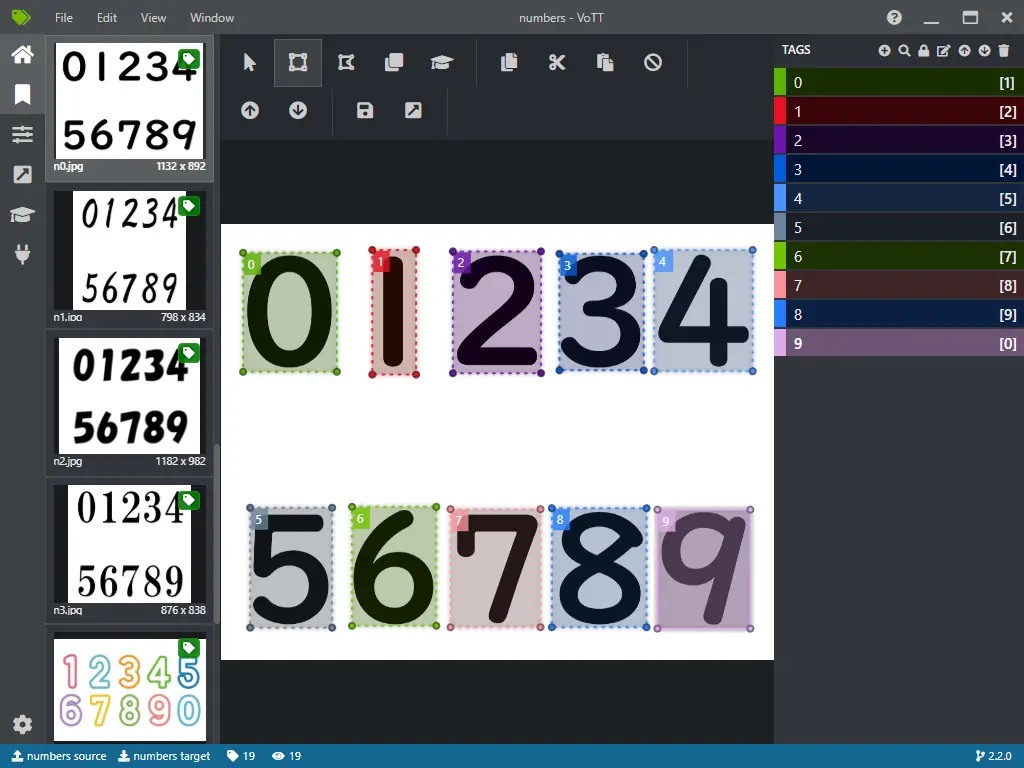
VoTTでタグ付けして学習データを用意する方法は以下の記事を参考にして下さい。

準備するファイルは以下の3つです。
| 準備するファイル | |
|---|---|
| 学習用TFRecordファイル | train.tfrecord |
| 検証用TFRecordファイル | val.tfrecord |
| ラベルファイル | tf_label_map.pbtxt |
学習する
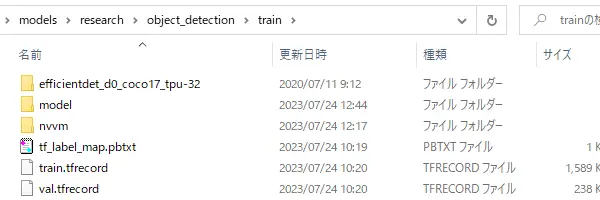
research/object_detection以下に学習用のフォルダーtrainを作成し移動します。
cd research/object_detection
mkdir train
cd train
trainフォルダー内に学習データの準備の項目で作成した3つのファイルをコピーしておきます。
TensorFlow 2 Detection Model Zooから事前学習した検出モデルをダウンロードして展開します。
今回はEfficientDet D0 512x512を利用します。
wget http://download.tensorflow.org/models/object_detection/tf2/20200711/efficientdet_d0_coco17_tpu-32.tar.gz -OutFile a.tar.gz
tar -zxvf a.tar.gz
rm a.tar.gz
modelフォルダーを作成してpipeline.configファイルをコピーします。
mkdir model
cp efficientdet_d0_coco17_tpu-32/pipeline.config model/
コピーしたmodel/pipeline.configをテキストエディターで編集します。
| 行数 | 変数名 | 書き換える値 |
|---|---|---|
| 3 | num_classes | 10(タグの数) |
| 134 | batch_size | 8(の倍数) ※バッチサイズについて参照 |
| 161 | fine_tune_checkpoint | "efficientdet_d0_coco17_tpu-32/checkpoint/ckpt-0" |
| 167 | fine_tune_checkpoint_type | "detection" |
| 168 | use_bfloat16 | false |
| 172,185 | label_map_path | "tf_label_map.pbtxt" |
| 174 | input_path | "train.tfrecord" |
| 189 | input_path | "val.tfrecord" |
学習を開始します。
python ../model_main_tf2.py --model_dir=model --pipeline_config_path=model/pipeline.config
学習が始まると100Stepごとにコンソールに学習状況が表示されます。
Ctrl+Cで学習を終了することができます。
I0724 12:47:08.308454 18308 model_lib_v2.py:705] Step 100 per-step time 1.610s
INFO:tensorflow:{'Loss/classification_loss': 1.1145076,
 'Loss/localization_loss': 0.022247026,
 'Loss/regularization_loss': 0.028340835,
 'Loss/total_loss': 1.1650954,
 'learning_rate': 0.00416}
I0724 12:47:08.308619 18308 model_lib_v2.py:708] {'Loss/classification_loss': 1.1145076,
 'Loss/localization_loss': 0.022247026,
 'Loss/regularization_loss': 0.028340835,
 'Loss/total_loss': 1.1650954,
 'learning_rate': 0.00416}
INFO:tensorflow:Step 200 per-step time 0.937s
I0724 12:48:41.869682 18308 model_lib_v2.py:705] Step 200 per-step time 0.937s
INFO:tensorflow:{'Loss/classification_loss': 0.7677954,
 'Loss/localization_loss': 0.014157516,
 'Loss/regularization_loss': 0.028340532,
 'Loss/total_loss': 0.81029344,
 'learning_rate': 0.0073200003}
I0724 12:48:41.870682 18308 model_lib_v2.py:708] {'Loss/classification_loss': 0.7677954,
 'Loss/localization_loss': 0.014157516,
 'Loss/regularization_loss': 0.028340532,
 'Loss/total_loss': 0.81029344,
 'learning_rate': 0.0073200003}
エラーが出力されて学習できない場合はトラブルシューティングをご覧ください。
トラブルシューティング
error: Can't find libdevice directory ${CUDA_DIR}/nvvm/libdevice
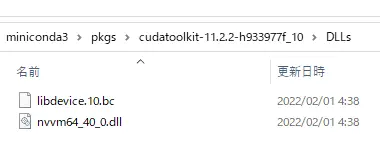
C:\Users\[ユーザー名]\miniconda3\pkgs\cudatoolkit-11.2.2-h933977f_10\DLLsフォルダー内のファイルをtrain/nvvm/libdeviceにコピーして下さい。
RESOURCE_EXHAUSTED: OOM when allocating tensor with ... device:GPU:0 by allocator GPU_0_bfc
GPUのメモリ不足なのでpipeline.configのbatch_sizeを小さくして下さい。
学習フォルダーの構成確認
学習に失敗する場合は念のためtrainフォルダー内の構成を確認して下さい。
バッチサイズについて
GPUの型番とバッチサイズの目安です。
| GPU | メモリ | バッチサイズ |
|---|---|---|
| GeForce RTX3090 | 24GB | 32 |
| GeForce RTX2080 | 8GB | 8 |
学習状況の確認
TensorBoardでより詳しい学習状況が確認できます。
新しいAnaconda PowerShell Promptを起動しtrainフォルダーに移動して以下のコマンドを実行します。
tensorboard --logdir=model
http://localhost:6006にブラウザでアクセスします。
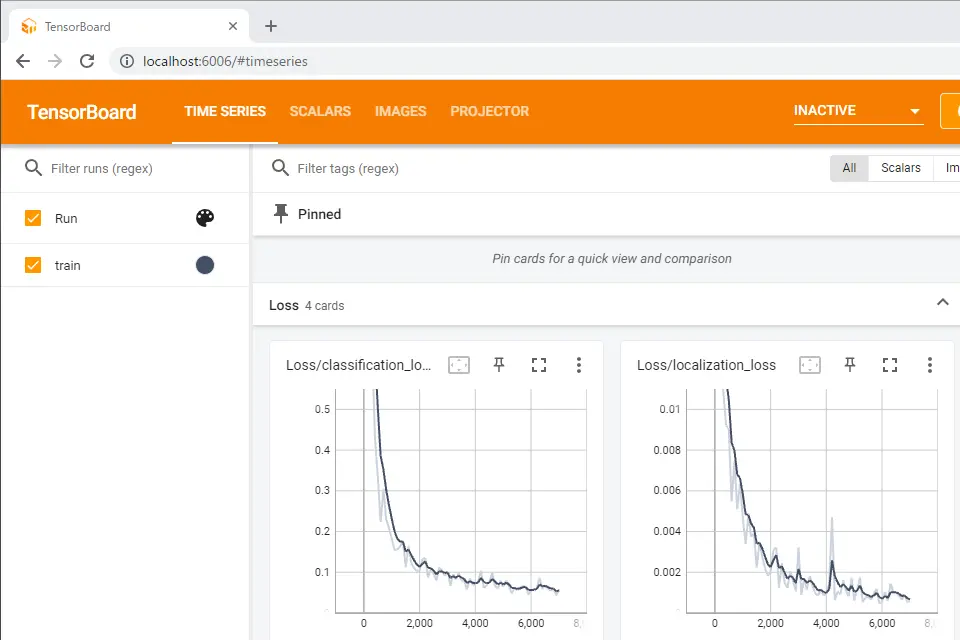
ブラウザで学習状況をリアルタイムで確認できます。この画像はGPUで1時間ほど学習した状況です。
推論する
学習したモデルをexportフォルダーにエクスポートします。
mkdir export
python ../exporter_main_v2.py `
--input_type image_tensor `
--pipeline_config_path model/pipeline.config `
--trained_checkpoint_dir model `
--output_directory export
ラベルファイルtf_label_map.pbtxtを読み込むためのスクリプトobject_detection/utils/label_map_util.pyをコピーします。
推論するPythonスクリプトの作成
import tensorflow as tf
import numpy as np
import matplotlib.pyplot as plt
import matplotlib.patches as patches
import label_map_util

path = 'test.jpg'
image = tf.image.decode_image(tf.io.read_file(path))
height = image.shape[0];
width = image.shape[1];

model = tf.saved_model.load('export/saved_model')

detections = model(image[tf.newaxis, ...])

classes = detections['detection_classes'].numpy().squeeze().astype(np.int32)
scores = detections['detection_scores'].numpy().squeeze()
boxes = detections['detection_boxes'].numpy().squeeze()

labelmap = label_map_util.create_category_index_from_labelmap(
    'tf_label_map.pbtxt', use_display_name=True)

fig, ax = plt.subplots()
ax.imshow(image)

for i in range(len(scores)):
    score = scores[i]
    if score < 0.9: break
    id = classes[i]
    box = boxes[i]
    y = height * box[0]
    x = width * box[1]
    h = height * (box[2]-box[0])
    w = width * (box[3]-box[1])
    rect = patches.Rectangle((x,y),w,h, linewidth=2, edgecolor='r', facecolor='none')
    ax.add_patch(rect)
    percent = int(100*score)
    ax.text(x,y,labelmap[id]['name'] + '(' +str(percent) + '%)')

plt.show()
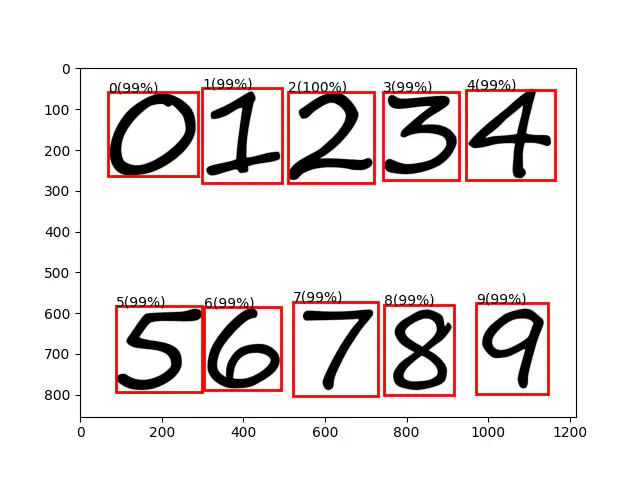
実行して正しく推論されているか確認して下さい。
誤った推論をされた画像を見つけたらVoTTでタグ付けして再学習させて精度を高めていきます。
ブラウザで推論する
TensorFlow.jsを利用すればウェブブラウザ上で推論することができます。
最初にTensorFlow.jsをインストールします。
pip install tensorflowjs
モデルをtfjs_modelフォルダーにコンバートします。
mkdir tfjs_model

tensorflowjs_converter --input_format=tf_saved_model `
--output_node_names='Postprocessor/ExpandDims_1,Postprocessor/Slice' `
--saved_model_tags=serve `
export/saved_model `
tfjs_model
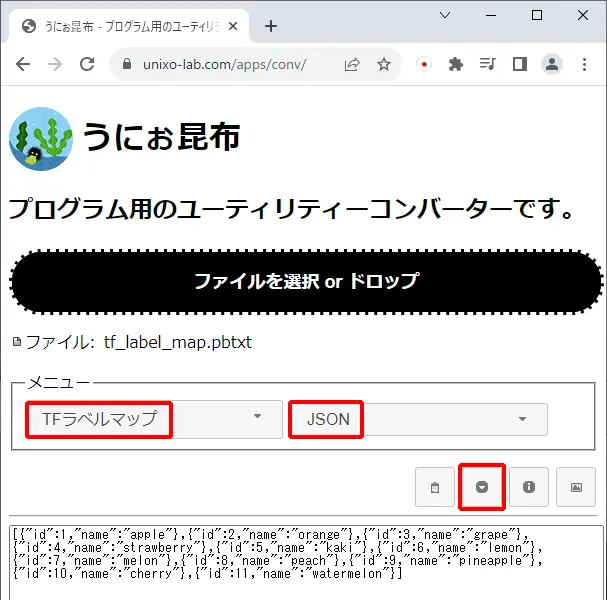
tf_label_map.pbtxtをJSONに変換します。
オンラインコンバーターのうにぉ昆布ではラベルファイルをJSONにする機能がありますのでご利用ください。
HTMLファイル index.html を作成します。
<html>
<head>
</head>
<body>
    <div id="canvas"></div>
    <script src="https://cdn.jsdelivr.net/npm/@tensorflow/tfjs"></script>
    <script src="index.js"></script>
</body>
</html>
JavaScriptファイル index.js を作成します。
async function createCanvas(img, scores, classes, boxes) {

    const canvas = document.createElement('canvas');

    canvas.width = img.width;
    canvas.height = img.height;
    const ctx = canvas.getContext('2d');
    ctx.drawImage(img, 0, 0, img.width, img.height);
    ctx.lineWidth = 4;
    ctx.font = '20px serif';

    const response = await fetch('tf_label_map_pbtxt.json');
    const json = await response.json();

    var labels = [];
    for (var i = 0; i < json.length; i++) {
        labels[json[i].id] = json[i];
    }

    for (var i = 0; i < scores.length; i++) {
        const score = scores[i];
        if (score < 0.9) break;
        const box = boxes[i];
        const y = img.height * box[0];
        const x = img.width * box[1];
        const h = img.height * (box[2] - box[0]);
        const w = img.width * (box[3] - box[1]);
        ctx.beginPath();
        ctx.moveTo(x, y);
        ctx.lineTo(x + w, y);
        ctx.lineTo(x + w, y + h);
        ctx.lineTo(x, y + h);
        ctx.lineTo(x, y);
        ctx.strokeStyle = 'red';
        ctx.stroke();
        ctx.strokeStyle = 'blue';
        ctx.strokeText(labels[classes[i]].name + '(' + parseInt(100 * score) + '%)', x, y);
    }

    document.getElementById('canvas').appendChild(canvas);
}

async function execute(img) {

    const model = await tf.loadGraphModel('tfjs_model/model.json');

    const input = tf.browser.fromPixels(img).expandDims(0);

    const detections = await model.executeAsync(input);

    const scores = await tf.squeeze(detections[1]).array();
    const classes = await tf.squeeze(detections[4]).array();
    const boxes = await tf.squeeze(detections[2]).array();

    await createCanvas(img, scores, classes, boxes);
}

async function run() {

    const img = document.createElement('img');
    img.onload = function () {
        execute(img);
    }
    img.src = 'test.jpg';
}

document.addEventListener('DOMContentLoaded', run);
ローカル環境で動作確認するためにPythonでサーバーを立てます。
py -3 -m http.server
http://localhost:8000/ へアクセスします。
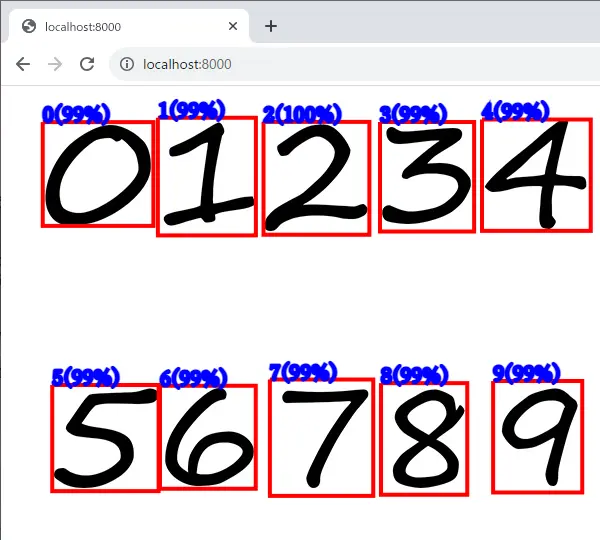
ウェブブラウザ上で推論できているか確認して下さい。
まとめ
画像内の物体検出方法を紹介してきましたがいかがでしょうか。最初は難しく感じるかも知れませんが、慣れると素早く物体検出器を作ることができるようになります。オリジナルの検出器を作って面白いアプリ開発などしてみてはいかがでしょうか。
最後に学習中のGPUの温度についてですが、RTX3090は80度未満に抑えられたのですがRTX2080は88度まで上昇してしまいました。RTX3090の方はエアフローも考えて自作したPCなので十分冷却されているみたいです。RTX2080のマシンは寄せ集めで作ったPCでケースも小さめなので熱がこもりやすいのかもしれません。GPUは高価なので故障されると大痛手です。機械学習はGPUに高負荷がかかるので冷却のことも考えて学習環境を整えなければなりませんね。
TensorFlow Object Detection APIで物体検出する方法を紹介しました。
アイディア次第で面白いアプリが作れるかもしれませんよ。
関連ページ
こちらのページも合わせてご覧下さい。