【Unity】VOICEVOXコアでリアルタイム音声合成する方法を紹介します!
VOICEVOXとはフリーの音声合成ツールで、エディターとエンジンとコア部分に分けられて配布されています。VOICEVOXエンジンはサーバー形式で配布されていてエンジンと通信して音声合成します。VOICEVOXコアはライブラリ(DLL)形式で配布されていて自アプリに組み込んで音声合成します。このページではVOICEVOXコアを利用してテキストから音声合成されたWAVEデータを作成しUnity上でリアルタイム再生するプログラムを実装します。VOICEVOXの詳細は本家サイトを参照してください。
VOICEVOXエンジンを利用してリアルタイム音声合成する方法はこちらをご覧ください。
必要なもののダウンロード
今回必要なものはVOICEVOXコアとOpen JTalkの辞書パッケージです。配布サイトからダウンロードします。
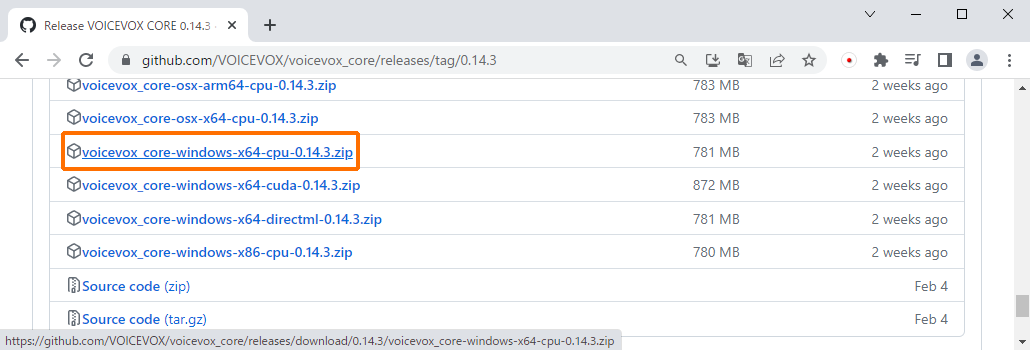
VOICEVOXコアのダウンロード
最初にVOICEVOXコアをダウンロードします。今回はCPU版を使用しますが必要に応じてCuda版, DirectML版をお試しください。
https://github.com/VOICEVOX/voicevox_core/releases/tag/0.14.3
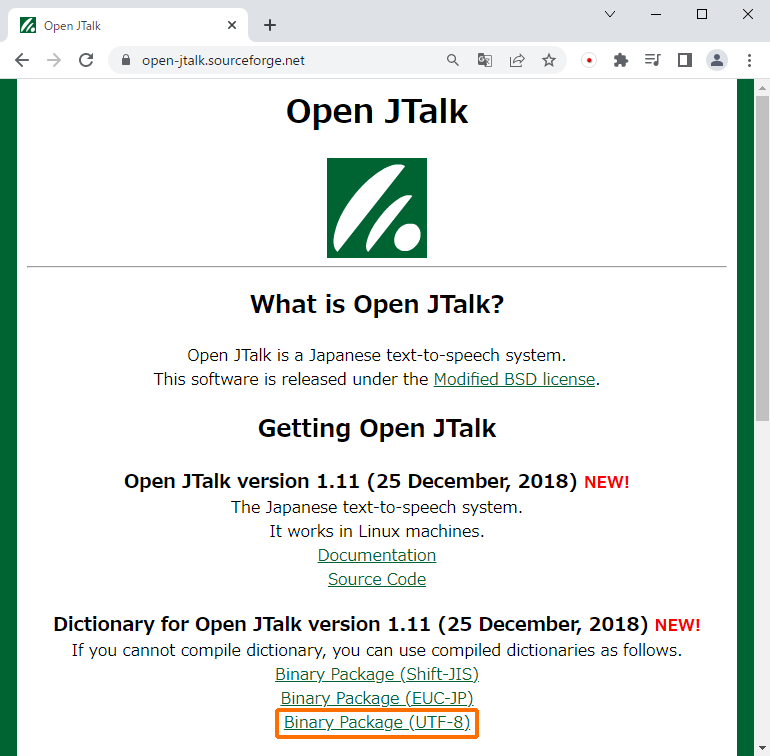
Open JTalk辞書パッケージのダウンロード
続いてOpen JTalkの配布サイトからUTF-8版の辞書パッケージをダウンロードして下さい。
https://open-jtalk.sourceforge.net/
ダウンロードして解凍したら準備完了です。
VOICEVOXコアのラッパーライブラリの実装
Unityから呼び出せるようにVOICEVOXコアの必要最小限の機能をラッピングしてDLLにします。
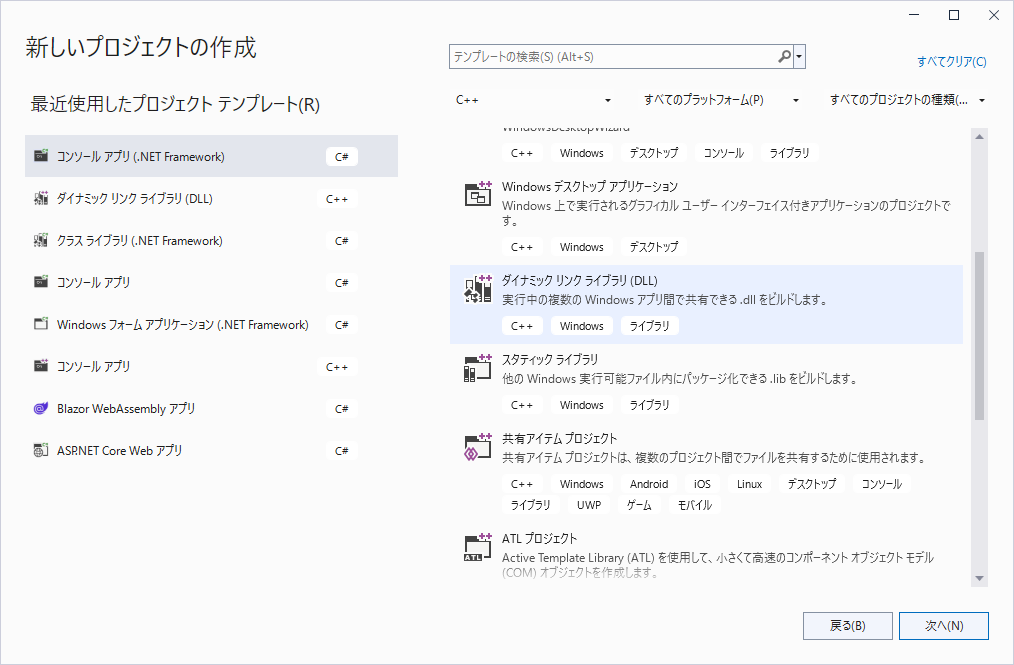
プロジェクトの作成
C++ダイナミックリンクライブラリ(DLL)プロジェクトを作成します。
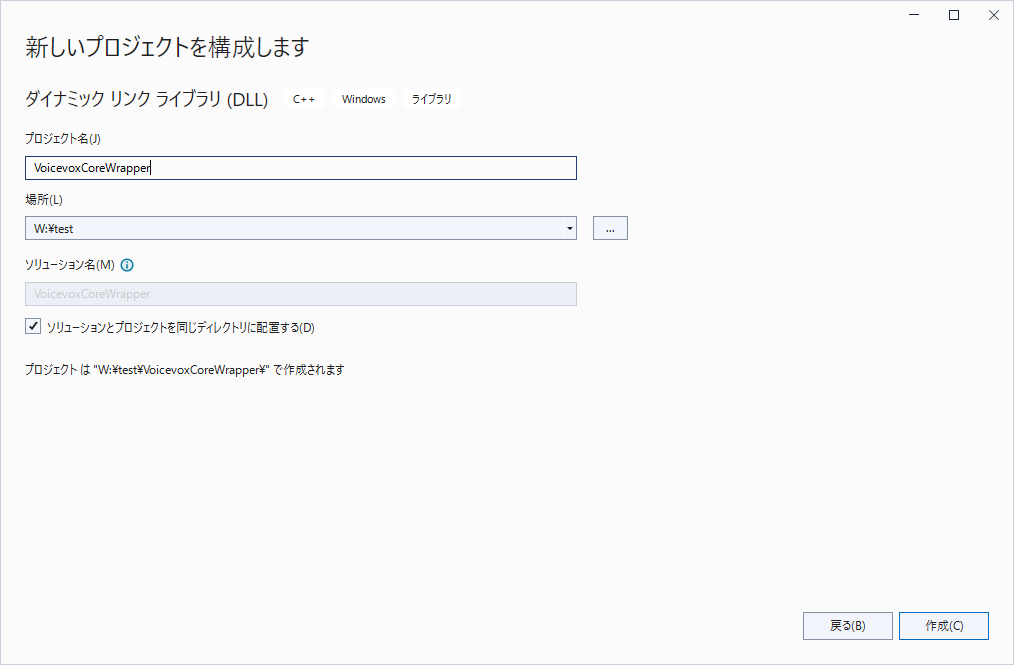
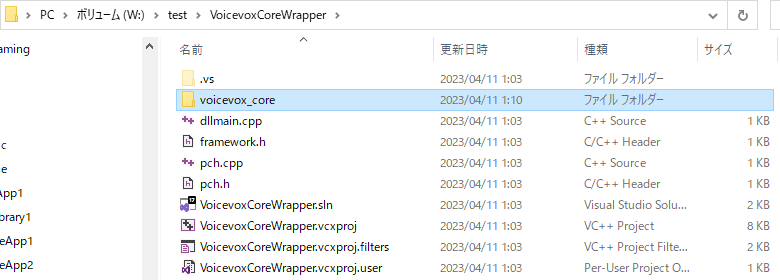
プロジェクトのルートにVOICEVOXコアをvoicevox_coreという名前でコピーします。
プリコンパイル済みヘッダーの編集
プリコンパイル済みヘッダー(pch.h)にVOICEVOXコアのヘッダーファイルとUTF-16からUTF-8へ変換するためのヘッダーファイルを追加します。
#ifndef PCH_H
#define PCH_H

// プリコンパイルするヘッダーをここに追加します
#include "framework.h"
#include "voicevox_core/voicevox_core.h"
#include <codecvt>
#include <string>

#endif //PCH_H
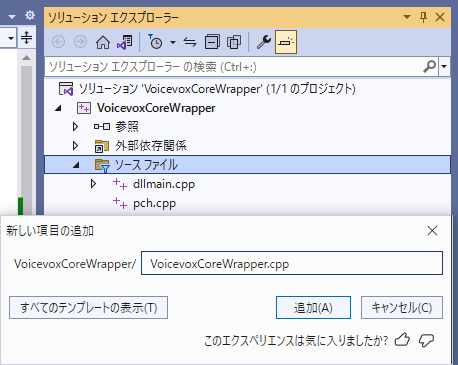
ソースコードの追加
ソースコード(VoicevoxCoreWrapper.cpp)を追加します。
ソースコードの編集
VoicevoxCoreWrapper.cppの編集をします。最初にプリコンパイル済みヘッダーをincludeします。VOICEVOXコアライブラリをリンクするためにpragmaディレクティブを追加します。関数名のマングルを回避するためにCリンケージを利用してDLLエクスポートするマクロDLL_EXPORTを定義します。
#include "pch.h"

#pragma comment(lib, "voicevox_core/voicevox_core.lib")

#define DLL_EXPORT extern "C" __declspec(dllexport)
続いてVOICEVOXコアの初期化関数、終了関数、音声合成関数、音声合成したWAVEバイナリを解放する4つの関数を実装します。全ての関数に共通するのはDLL_EXPORTマクロを修飾してcdeclで呼び出すことです。
初期化関数を実装します。オプションにOpen JTalk辞書のパスを設定します。今回はルートディレクトリに配置しますのでフォルダ名を設定します。オプションを設定した後でvoicevox_initialize関数でVOICEVOXコアを初期化します。voicevox_initialize関数は0以外がエラーであるVoicevoxResultCodeを返します。
DLL_EXPORT int __cdecl InitializeVoicevox()
{
    VoicevoxInitializeOptions options = voicevox_make_default_initialize_options();
    options.open_jtalk_dict_dir = "open_jtalk_dic_utf_8-1.11";
    options.load_all_models = true;
    return voicevox_initialize(options);
}
終了関数を実装します。voicevox_finalize関数を呼び出すだけです。
DLL_EXPORT void __cdecl FinalizeVoicevox()
{
    voicevox_finalize();
}
音声合成関数を実装します。テキストとスピーカー(話し手)IDからWAVEバイナリを作成します。第1引数はUTF-16のテキストでUTF-8に変換してからvoicevox_tts関数に渡します。第3引数はバイナリの長さを受け取るアドレス、第4引数はバイナリを受け取るアドレスを渡します。戻り値はVoicevoxResultCodeで0以外がエラーになります。
DLL_EXPORT int __cdecl TextToSpeech(const wchar_t* text, int speaker_id, uintptr_t* length, uint8_t** wav)
{
    std::wstring_convert<std::codecvt_utf8_utf16<wchar_t>> cvt;
    std::string str = cvt.to_bytes(text);
    VoicevoxTtsOptions options = voicevox_make_default_tts_options();
    return voicevox_tts(str.c_str(), speaker_id, options, length, wav);
}
音声合成したWAVEバイナリを解放する関数を実装します。WAVEバイナリを引数でvoicevox_wav_free関数に渡して呼び出します。
DLL_EXPORT void __cdecl FreeWav(uint8_t* wav)
{
    voicevox_wav_free(wav);
}
VoicevoxCoreWrapper.cpp
#include "pch.h"

#pragma comment(lib, "voicevox_core/voicevox_core.lib")

#define DLL_EXPORT extern "C" __declspec(dllexport)

DLL_EXPORT int __cdecl InitializeVoicevox()
{
    VoicevoxInitializeOptions options = voicevox_make_default_initialize_options();
    options.open_jtalk_dict_dir = "open_jtalk_dic_utf_8-1.11";
    options.load_all_models = true;
    return voicevox_initialize(options);
}

DLL_EXPORT void __cdecl FinalizeVoicevox()
{
    voicevox_finalize();
}

DLL_EXPORT int __cdecl TextToSpeech(const wchar_t* text, int speaker_id, uintptr_t* length, uint8_t** wav)
{
    std::wstring_convert<std::codecvt_utf8_utf16<wchar_t>> cvt;
    std::string str = cvt.to_bytes(text);
    VoicevoxTtsOptions options = voicevox_make_default_tts_options();
    return voicevox_tts(str.c_str(), speaker_id, options, length, wav);
}

DLL_EXPORT void __cdecl FreeWav(uint8_t* wav)
{
    voicevox_wav_free(wav);
}
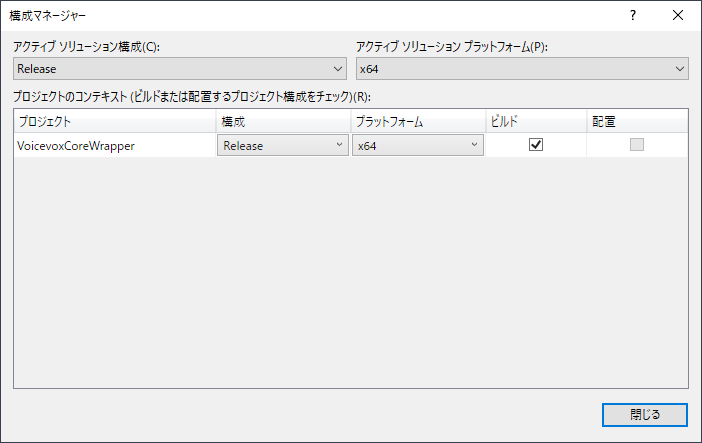
DLLのビルド
x64でReleaseビルドします。構成マネージャーで確認して下さい。
Releaseビルドします。
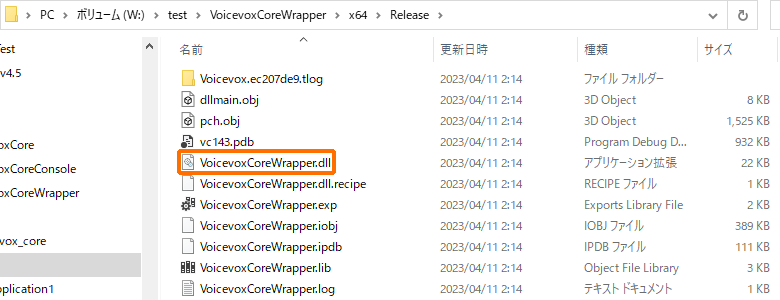
VoicevoxCoreWrapper.dllが生成されたことを確認して下さい。
Unity用のスクリプトの作成
最初にC#からDLL内の関数を呼び出すクラスを実装します。DllImport属性にDLL名を設定してcdeclで呼び出します。文字コードはUnicodeを利用します。TextToSpeech関数で受け取るWAVバイナリとその長さはrefキーワードを付けて受け取ります。
VoicevoxCore.cs
using System;
using System.Runtime.InteropServices;

public class VoicevoxCore
{
    [DllImport("VoicevoxCoreWrapper", CallingConvention = CallingConvention.Cdecl)]
    public static extern int InitializeVoicevox();

    [DllImport("VoicevoxCoreWrapper", CallingConvention = CallingConvention.Cdecl)]
    public static extern void FinalizeVoicevox();

    [DllImport("VoicevoxCoreWrapper", CallingConvention = CallingConvention.Cdecl, CharSet = CharSet.Unicode)]
    public static extern int TextToSpeech(string text, int speaker_id, ref int length, ref IntPtr wav);

    [DllImport("VoicevoxCoreWrapper", CallingConvention = CallingConvention.Cdecl)]
    public static extern void FreeWav(IntPtr wav);
}
続いてゲームオブジェクトにアタッチするコンポーネントを実装します。MonoBehaviourを継承してAwake関数でVOICEVOXコアを初期化し、OnDestroy関数で終了します。
private void Awake()
{
    VoicevoxCore.InitializeVoicevox();
}

private void OnDestroy()
{
    VoicevoxCore.FinalizeVoicevox();
}
VoicevoxCore.TextToSpeech関数で音声合成します。WAVEバイナリはIntPtrで受け取ります。
string text = "こんにちは";
int speaker = 0;
int length = 0;
IntPtr wav = IntPtr.Zero;

VoicevoxCore.TextToSpeech(text, speaker, ref length, ref wav);
スピーカーID一覧はこちらをご覧下さい。
Marshal.Copy関数でIntPtrからバイト配列へWAVEバイナリをコピーします。バイト配列へコピーした後はVoicevoxCore.FreeWav関数でWAVEデータを解放します。
byte[] buffer = new byte[length];
Marshal.Copy(wav, buffer, 0, length);
VoicevoxCore.FreeWav(wav);
最後にWAVEバイナリからAudioClipを作成してAudioSourceで再生します。
AudioClip clip = Wav.ToAudioClip(buffer, text);
AudioSource source = gameObject.AddComponent<AudioSource>();
source.PlayOneShot(clip);
WAVEバイナリからAudioClipを作成する方法はこちらをご覧下さい。
VoicevoxCoreTest.cs
using System;
using System.Runtime.InteropServices;
using UnityEngine;

public class VoicevoxCoreTest : MonoBehaviour
{
    private void Start()
    {
        string text = "こんにちは";
        int speaker = 0;
        int length = 0;
        IntPtr wav = IntPtr.Zero;

        VoicevoxCore.TextToSpeech(text, speaker, ref length, ref wav);

        if(wav != IntPtr.Zero)
        {
            byte[] buffer = new byte[length];
            Marshal.Copy(wav, buffer, 0, length);
            VoicevoxCore.FreeWav(wav);

            AudioClip clip = Wav.ToAudioClip(buffer, text);
            AudioSource source = gameObject.AddComponent<AudioSource>();
            source.PlayOneShot(clip);
        }
    }

    private void Awake()
    {
        VoicevoxCore.InitializeVoicevox();
    }

    private void OnDestroy()
    {
        VoicevoxCore.FinalizeVoicevox();
    }
}
Unityシーンの実行
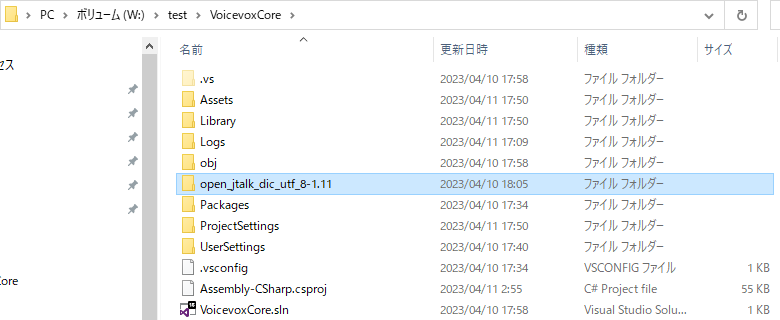
ダウンロードしておいたOpen JTalkの辞書open_jtalk_dic_utf_8-1.11をUnityのプロジェクトルートへコピーします。
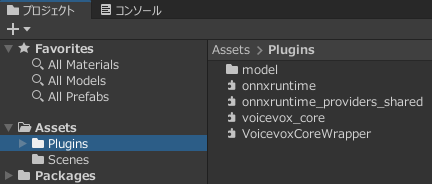
続いてVOICEVOXコアのDLLとラッパーDLLをAssets以下にコピーします。この時modelフォルダも忘れずにコピーして下さい。
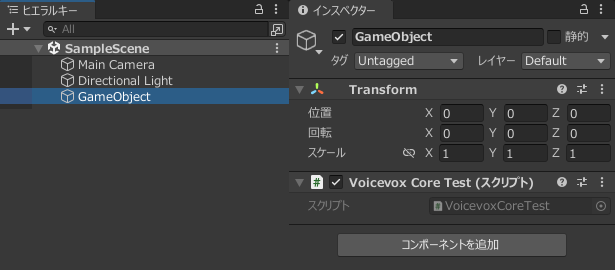
ヒエラルキーに適当なゲームオブジェクトを作成してインスペクターからスクリプトを追加して下さい。
Unityを実行して「こんにちは」と音声が再生されることを確認して下さい。
リアルタイムで音声合成するプログラムを作成することができました。
VOICEVOXコアとエンジンは開発環境に合わせて使い分けましょう。
関連ページ
こちらのページも合わせてご覧下さい。